 Cornucopia, the horn of plenty, is a symbol of abundance and nourishment in the classical myths and is often associated with autumn. And when I prepared my little pastries I look on the nuts and apples and that little cornucopia would be the right way to celebrate autumn plenty.
It is apple and no other fruit that means autumn to me. And I can’t stop praising the heirloom apples which are often much more aromatic then the new breeds. And for baking cake there is no better apple then my favourite Jakob Lebel. It is a tree which gives a plenty of fruits and which is often found in old gardens and orchards. In the beginning of last century the meeting of german pomiculture society named it as one of tree apple variety they advised to grow because it is so fruitful, aromatic and robust.
 And it is a great apple to fill into my cornucopia. I cooked it to a compote and add put it on top of a layer of nut filling. The dough is the same as my favourite sunday braid. Together with the filling the cream in the dough helps to keep it very long fresh.
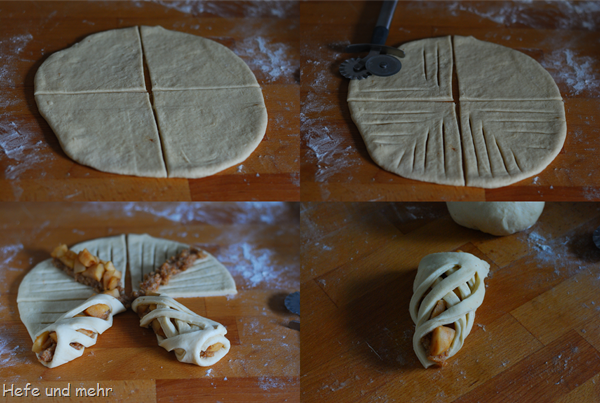
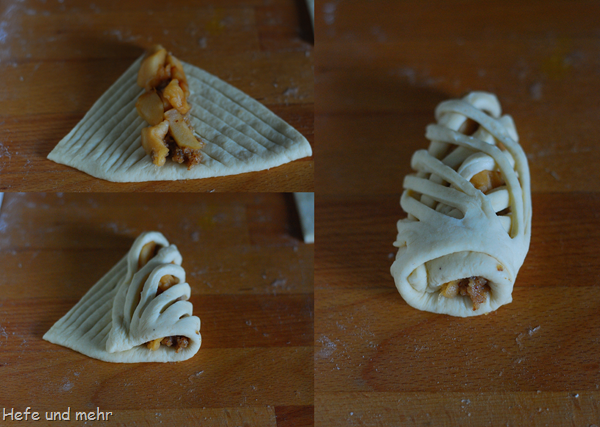
To achieve the horn of plenty form is much easier as it looks. I tested to variants, one with wide stripes and one with smaller ones and both looks good. The smaller ones are more gracile, the wider ones are easier to handle. I show you here both variants, as both looks very well.
Cornucopia with Apple Nut Filling
Sweet Starter 
- 50g Sweet Starter
- 50g flour Type 550
- 25g Water
Dough
- Sweet Starter
- 420g flour Type 550
- 150g cream
- 75g Wasser
- 75g sugar
- 50g Butter
- 55g Egg (1 Egg size M)
- 10g fresh yeast
- 4g Salt
Apple compote
- 400g peeled Apple
- 15g sugar
- 30g Water
Filling
- 100g grounded Nuts(Walnuts, hazelnuts or almonds)
- 25g dry bread crumbs
- 50g sugar
- 100g Milk
- 1 Tso cinnamon
- 1 Egg white
For Glazing
-
1 Egg yolk
-
1 Tbs Water
Mix the ingredients of the sweet starter and let it rise for 4 hours at 30°C.
Knead all ingredients except sugar and butter for 5 min at slow speed. Then knead 7 min at fast speed. Now add the sugar in small increments and knead until the sugar is incooperated before adding the next sugar. At last add the butter all at once. Knead to full gluten development.
Let rise overnight in the fridge or for one hour temperature plus 1-2 hours in the fridge.
While dough is fermenting prepare the filling: Caramelize sugar in a pan until golden then take from the heat an add the milk. Place the pan back on the heat and simmer until the caramelized sugar is completely disslolved. Now add grinded hazelnuts, bread crumbs and spices and stir the mixture until its starts to bubble. Now set aside to cool down. After cooling fold in the egg white.
For the compote cut the apple in small pieces. Cook until the apples are soft but still keep their shape. Cooking time depends on the sort of apples and differ between 5 – 10 min. Let it cool to room temperature.

Now divide the dough into four equal pieces and roll each piece into a circle of 22 cm diameter. Cut the circle into four parts so that four triangles are formed. Cut stripes into the sides of the triangle, either in 1 cm width (above) or 0.5cm (below pictures). Put a stripe of nut filling in the middle, place the apple compote on top and folds the sides of triangle over the filling.

Proof for 60 min. In the meantime heat the oven to 175!C
Mix egg yolk with water and brush the pastry with the mixture. Bake at 175°C for about 20 –25 min with steam.
After cooling sprinkle with powdered sugar
Deutsch


Wow, Stefanie, du bist einfach großartig! Vielen vielen DANK für deine superschnelle Antwort. Du hast Recht, Ich musste das 550er Weizenmehl mit ca 70g Dinkel-Vollkorn auffüllen (aufgrund der gähnende Leere der Regale in Coronazeiten .. ). Daher hatte ich schon einen guten Schluck mehr Wasser hinzugefügt.
Als blutiger Hefe-Anfänger sollte man eben nichts an den Zutaten ändern sondern lieber das Rezept entsprechend der vorhanden Zutaten wählen, aber deine Cornucopia sehen einfach sooooo lecker aus!
Ich werde ihm nun vorsichtig noch etwas mehr Flüssigkeit beigeben, ihn nochmal ruhen lassen und dann sicher mehr Glück haben.
Hallo liebe Stefanie,
ich habe den Süßen Starter über 3 Tage hin gehegt und gepflegt, dann damit den Teig nach Anleitung zubereitet. Der Starter hatte sein Volumen gut verdoppelt alles sah vielverpsrechend aus. Allerdings habe ich keine Küchenmaschine sondern knete von Hand. Der Teig war so fest und rissig, dass ich noch etwas mehr Wasser zugefügt habe. Ich habe wirklich lange lange geknetet (über eine halbe Stunde), der Glutentest zeigte dennoch kein schönes Fenster, eher mittlere Glutenentwicklung. Ich wollte ihn auch nicht überkneten, daher lies ich ihn erstmal im Kühlschrank über Nacht, in der Hoffnung er geht nochmal. Aber nun ist er noch fester und gar nicht mehr dehnbar, er reisst sofort. Hast du eine Idee wie ich ihn retten kann??
Ich möchte ihn auf keinen Fall aufgeben ! Irgendetwas muss man doch machen können oder?
Ich danke dir tausendfach für deine Antwort und wünsche einen herrlichen Sonntag!
DANKE!
@Carin: Mittlere Glutenentwicklung ist erstmal in Ordnung – gerade, wenn man von Hand knetet. Und das der Teig im Kühlschrank fester wird und leichter reißt, ist nicht ungewöhnlich, da auch die Butter im Kühlschrank natürlich fest wird. Darum lässt sich ein “normaler” Zopfteig aus dem Kühlschrank auch leichter formen.
Wenn dein Teig aber schon vor dem Kühlschrank so fest war, braucht dein Mehl auf jeden Fall mehr Flüssigkeit. Ist es evtl. ein “Backstarkes” Mehl mit höheren Proteingehalt (z.B. Manitoba oder T55)? Ich würde jetzt vorsichtig Wasser einarbeiten, bis die Teigkonsistenz weich, aber nicht klebrig ist. Danach sollte der Teig nochmal 1-2 Stunden ruhen, damit das Glutengerüst entspannen kann.
Liebe Stefanie,
Ich bin gerade auf der Suche nach einem Rezept für Apfel Zupfbrot, wir gehen unter in Äpfeln, ich habe aber vermutlich keine Zeit, diese tollen Teilchen zu formen.
Denkst Du, der Teig würde auch in Scheiben und in einer Kastenform mit Apfelfüllung dazwischen funktionieren?
Liebe Grüße!
Bärbel
@Bärbel: Wenn man die Füllung dünn aufträgt, sollte es klappen. Alternativ würde ich einen großen Zopf in Anlehnung an einen Nusszopf formen.
Danke für die schnelle Antwort! Ich probiere es einfach aus, alle anderen Rezepte, die ich gefunden habe, sind mit ewig viel Hefe… Ich werde berichten 🙂
Das ist ein Kunstwerk, eine ganz tolle Idee, liebe Grüsse 🙂
Vielen Dank fuer die ausfuehrliche Beschreibung, wirklich leicht nachzumachen , sieht fantastisch aus. Nach diesem positiven Anfang wage ich mich an weitere Rezepte. Toller Blog!!
@Eva: Danke schön 🙂 Ich freue mich, dass sie dir gefallen haben!
Wunderschöne Idee, liebe Stefanie. Die sehen umwerfend aus!
Wow, sind die hübsch! Was für eine schöne und eigentlich ganz einfach Art, die Teilchen zu formen! Vielen Dank für die tollen Rezepte und Anregungen, Susanne
Wenn man kein Susser starter hat, kann man dass den mit Hefe machen oder Sauerteig?
@Marion: Du kannst stattdessen eine Biga ansetzen: Dazu werden 90g Mehl Type 550, 40g Wasser und 0,5g frische Hefe (ein Minibröckchen) miteinander verknetet. Die Biga für mindestens 16 Stunden im Kühlschrank reifen lassen, dann wie im Rezept beschrieben fortfahren.